To proceed with Okay integration using our SaaS platform, you are required to create an account using this link. Once you are successfully signed up, login in with the credentials that you used to create the account here. Once you are logged in to your dashboard, click the Tenants tab on the left navigation bar as shown below.
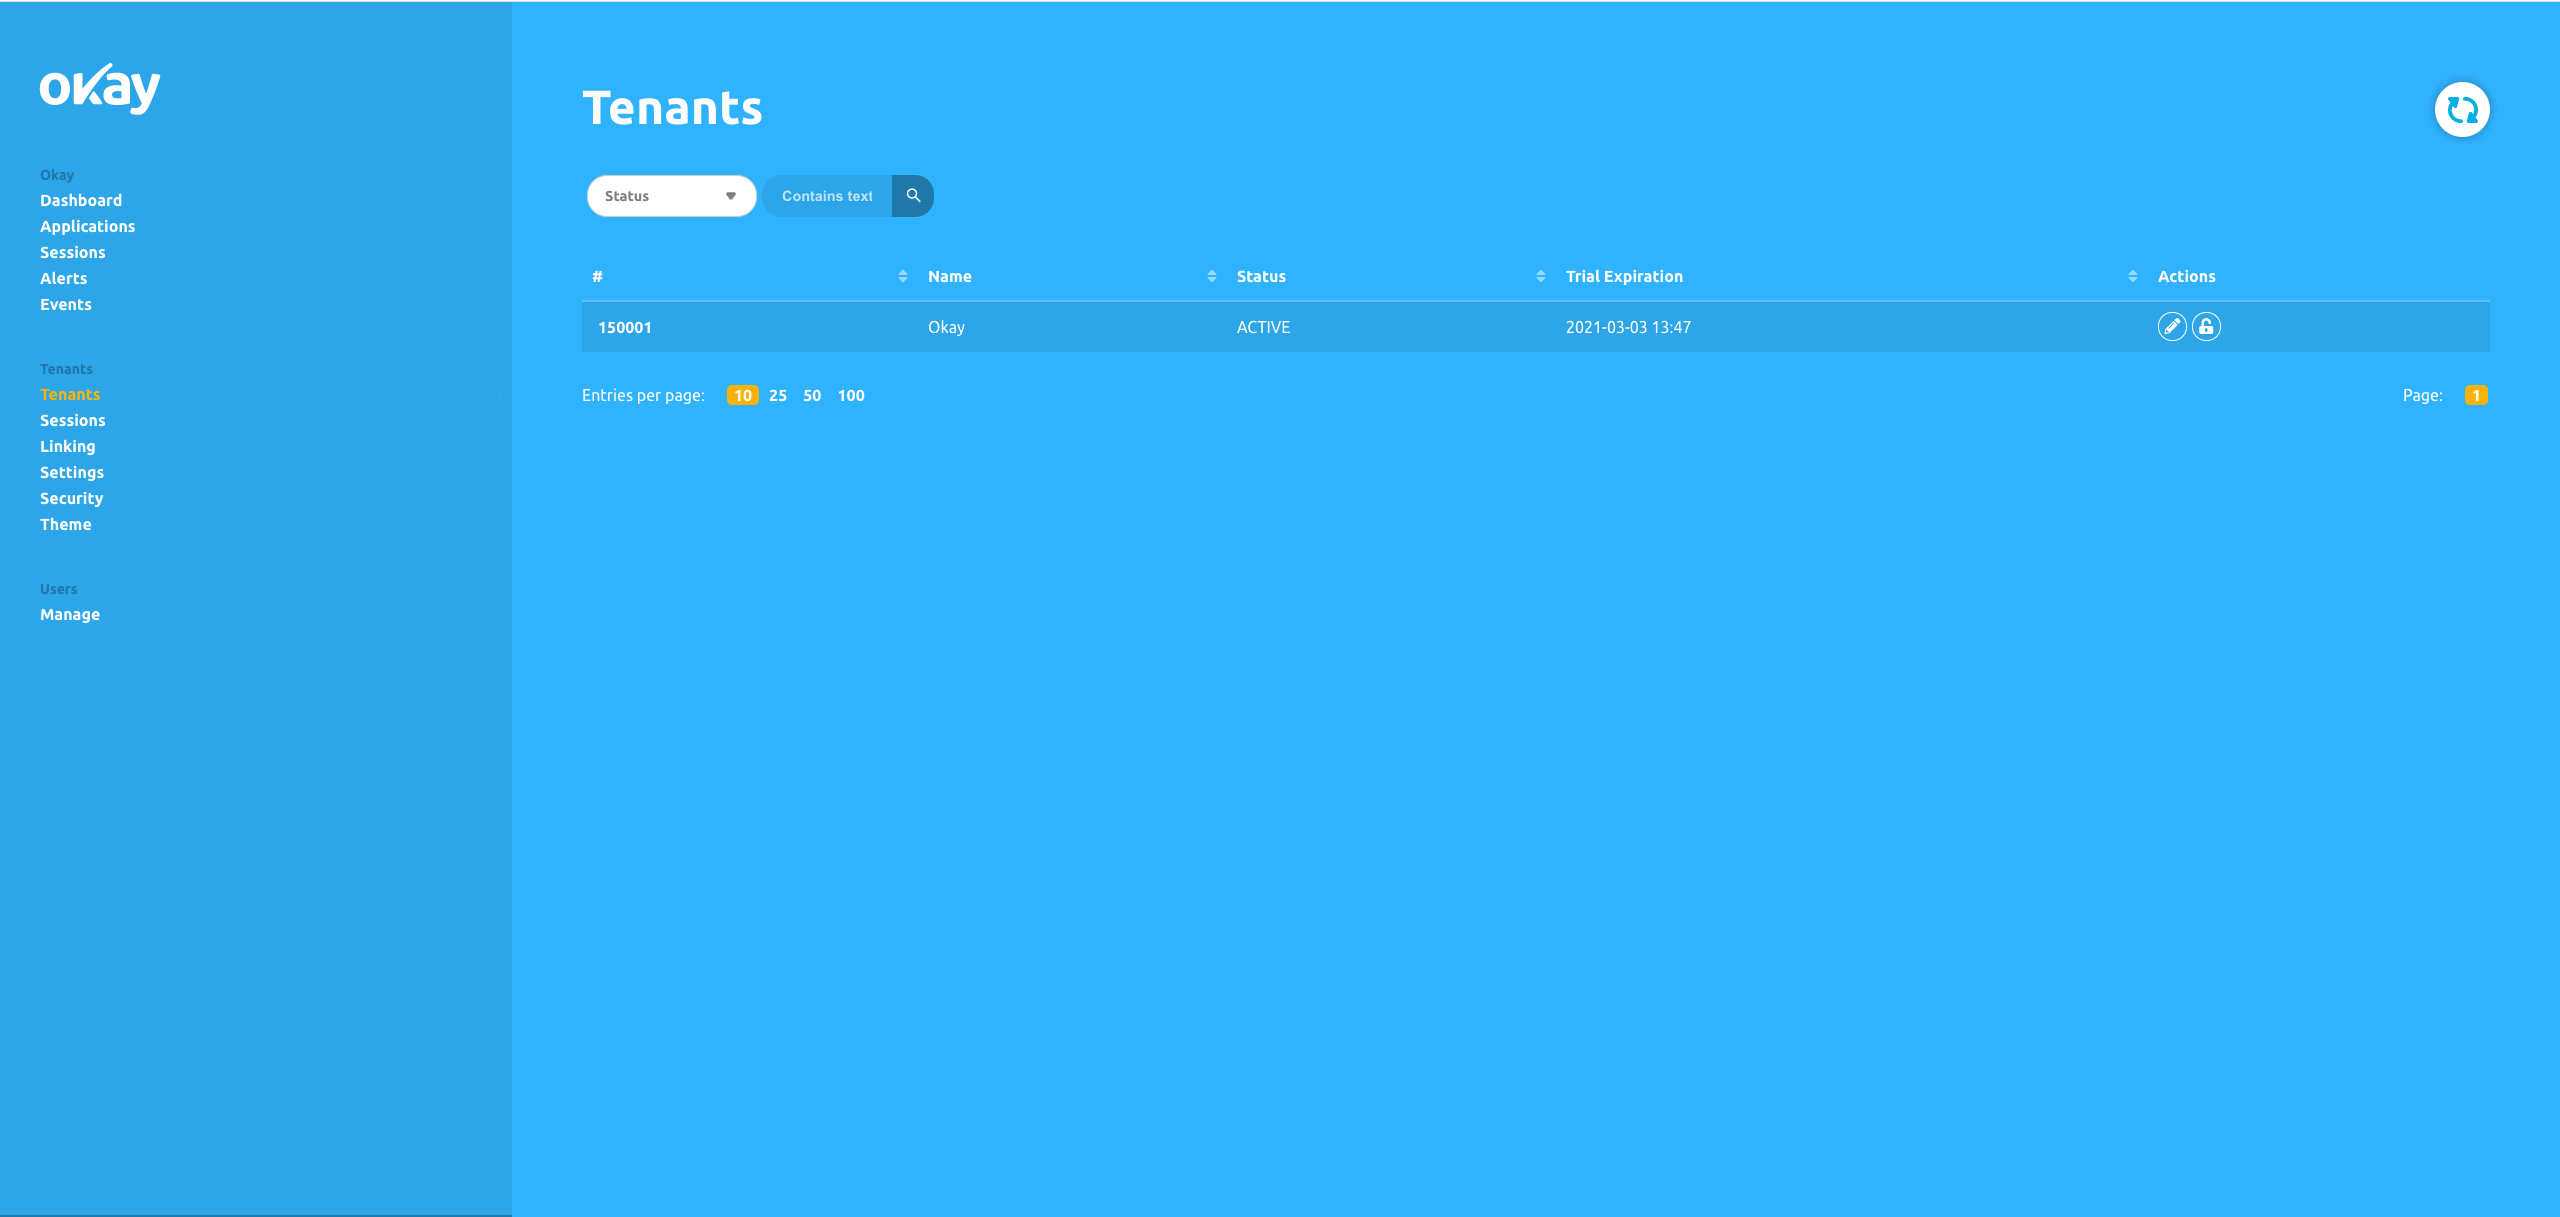
The Tenants web page is where you will register your service which will communicate directly with Okay secure servers, initiating authentications and authorising secure transactions. Your tenant page should present a table that is similar to the table below.
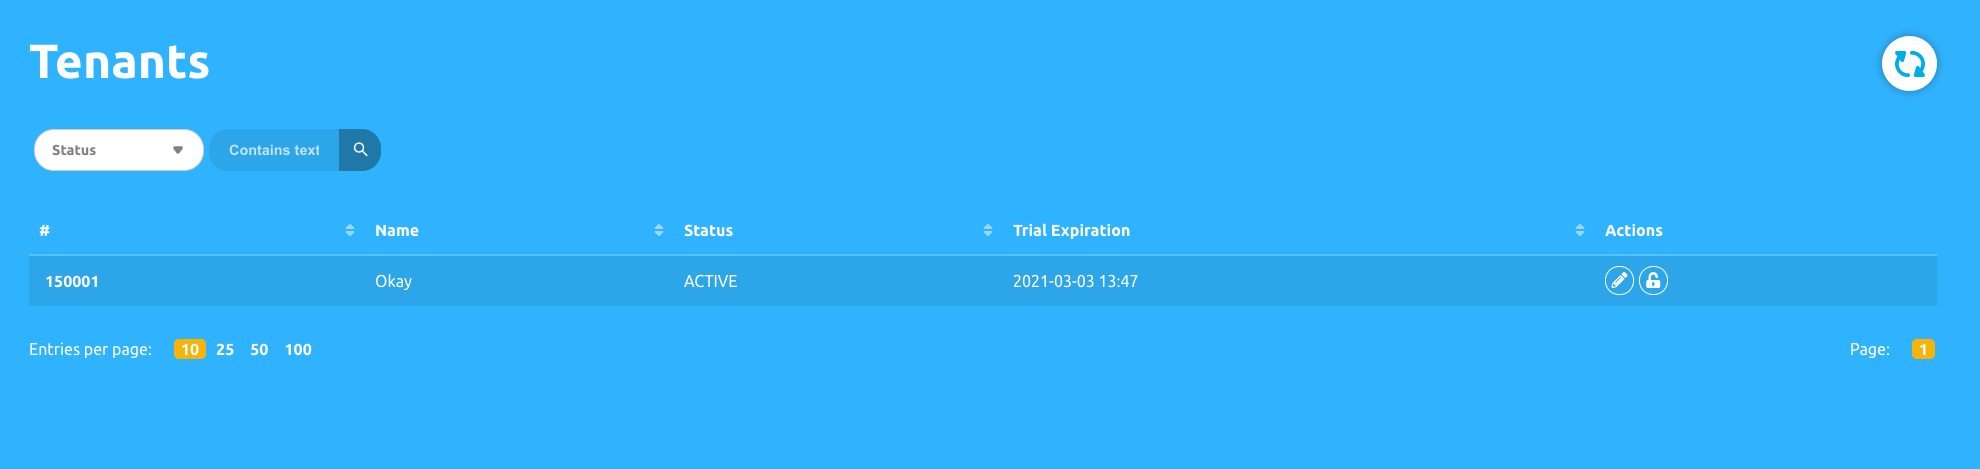
If you check the tenants’ page, you will see that you already have an entry in the Tenants table. The contents of that row are essential in understanding how to integrate Okay into your server.
The first column under the table is what we refer to as your Tenant ID.
In the image above, my Tenant Id is:
150001
It is crucial that you take note of this value, as we will be using it for our transactions/ authentication.
Name
The text under the Name column in the Tenants table is the name of the company you provided at the time of your sign up.
Status
Specifies the status of your tenant.
Trial Expiration
Shows your tenant trial expiration date, if you are still on trial mode.
Actions
The Action column has two buttons that allow us to manage our tenant credentials.
To make our tenant useful, we will be adding more information to the tenant to connect properly/securely to Okay servers. Click on the pencil icon under Actions to complete the tenant registration.
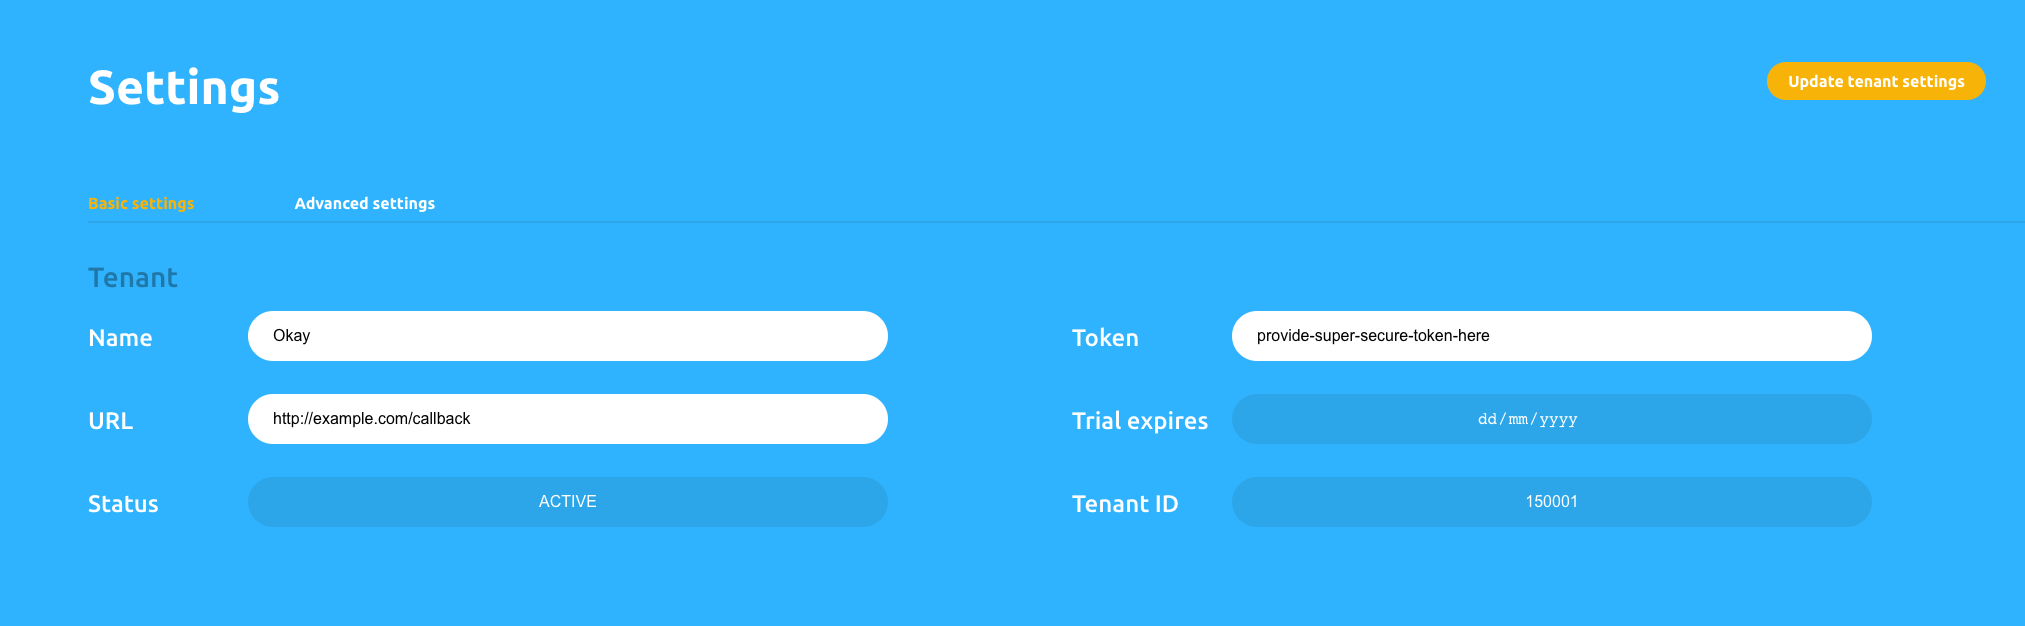
To be able to receive feedback from Okay servers, you will need to add a valid callback URL. This is an endpoint on your server that will be used as a point of communication by Okay to notify your server about the status of transactions/authentication to the Callback input field.
To verify all your requests, we will need to generate a secret secure token (or secret) that will be used to verify all transactions by Okay secure servers. This token acts as an auth token The token could be any alphanumeric secure string that contains about 30 characters (or more) and must always be kept secret.
Note: we will be referring to this Token as secret token in further illustrations.
Before we can authorise transactions using Okay, we need to link our users to Okay. This enables us to identify all unique transactions being initiated by different unique users.
Before we proceed to link users to Okay, we need to generate and store a Unique Identifier for every end-user in order to differentiate all your users. You can use any alpha-numeric character to compose this value, for example, a UUID. We will be using this value in all our requests as User Unique Identifier. This normally serves as value to the "userExternalId" key/property in our payload.
  {
    "tenantId": "<your tenant id>",
    "userExternalId": "User Unique Identifier",
    "signature": "BASE64[SHA256(tenantId | userExternalId | secret)]"
  }
The tenantId key in our payload above is the ID we got from our Tenants table. Please refer to the Getting Started section of this documentation if you don't already have your tenant ID.
The userExternalId key in our payload above is the User Unique Identifier you created for your users in order to differentiate them as described in the Provide a Unique Value Generator section of this documentation above.
The signature key in our payload above is a hash that is generated from concatenating your tenantId + userExternalId + secret token (also known as the Token you added to your tenant), then passing the concatenated string as value to SHA256() algorithm. We encode whatever value or string we got from the SHA256() algorithm in BASE64.
  const crypto = require('crypto')
  const axios = require('axios')
  const PSS_BASE_URL = 'https://demostand.okaythis.com';
  const tenantId = 150001; // replace with your tenantId
  const userExternalId  = 'uid406jkt'; // replace with your unique user id
  const secret = 'securetoken'; // replace with your secret
  const hashStr = `${tenantId}${userExternalId}${secret}`;
  const signature = createHashSignature(hashStr);
  console.log(signature) // returns zqVmg24iAeAqhKdyFOClJdmaB1NBE4lm4K/xnZUwg7M=
  function createHashSignature(hashStr) {
    return crypto
      .createHash('sha256')
      .update(hashStr)
      .digest('base64')
  }
  ...
To link a user, we need to send our JSON payload as a POST request to this endpoint below:
https://demostand.okaythis.com/gateway/linkYou can see a detailed explanation of the signature generation algorithm on the Signature Generation page.
  const crypto = require('crypto')
  const axios = require('axios')
  const PSS_BASE_URL = 'https://demostand.okaythis.com';
  const tenantId = 150001; // replace with your tenantId
  const userExternalId  = 'uid406jkt'; // replace with your unique user id
  const secret = 'securetoken'; // replace with your secret
  const hashStr = `${tenantId}${userExternalId}${secret}`;
  const signature = createHashSignature(hashStr);
  axios({
    method: 'post',
    headers: {
      'Content-Type': 'application/json'
    },
    url: `${PSS_BASE_URL}/gateway/link`,
    data: {
      tenantId,
      userExternalId,
      signature
    }
  })
  .then((response) => {
    console.log(response.data);
  })
  .catch((error) => {
    console.log(error.response.data)
  });
  function createHashSignature(hashStr) {
    return crypto
      .createHash('sha256')
      .update(hashStr)
      .digest('base64')
  }
{
"linkingCode": "980565",
"linkingQrImg":
"iVBORw0KGgoAAAANSUhEUgAAASwAAAEsAQAAAABRBrPYAAABhUlEQVR42u3aQXKDMAwFUGVYsOQIHIWjhaPlKBwhSy8yqLIkm9CUNMae6XTme0XMW8WqLCkl/mTdCQwMDAzsb1ggW0PomIkm2e5W3+vAqpk+8zLwg+xYgjDeXoHVsfidT8JY3s5+Cjz7uYA1Y7KE2SmAtWaPC9OVFyKwlizlkF2QH6casCK23YDKliH8clGCFbC89O31Nt7t7VGZB1bEAl3YcwgpY4321yAHO8UsRcsn8ZKZRw37mKK/lcdgZ5itm+WQHORixh/+FsCKWYxtmnKuHjXs4524PwWwU0w35eKjPtZvwtIpEPUMVs/Iyrb+Odr9AayeWdOhzZ0FudVvqdIAq2J+A3r9Jtu9VxpgTVicSOROWY4j5+pdeQx2iu27j9zTzWkWBFbFcu8cmw4NcvIm+uUGBDvBtqm7VRoW7TYCAqtnPrdM02BfyYO1YpyajtXbELB2TH+Ss9SxHk4wwIrZU11hD7G5ixO2AFbPdlP32NOxNdHvhvNgnzL8Xw0YGBjYP2ZfZfRH9E/qf44AAAAASUVORK5CYII=",
"status": {
"code": 0,
"message": "OK"
}
}An end-user needs the linking code to accomplish linking.
When you receive a response from the Okay service, check if it was successful by examining the status object. All valid codes are listed on the Server Response Status Codes page.
The purpose of the linking is explained here.
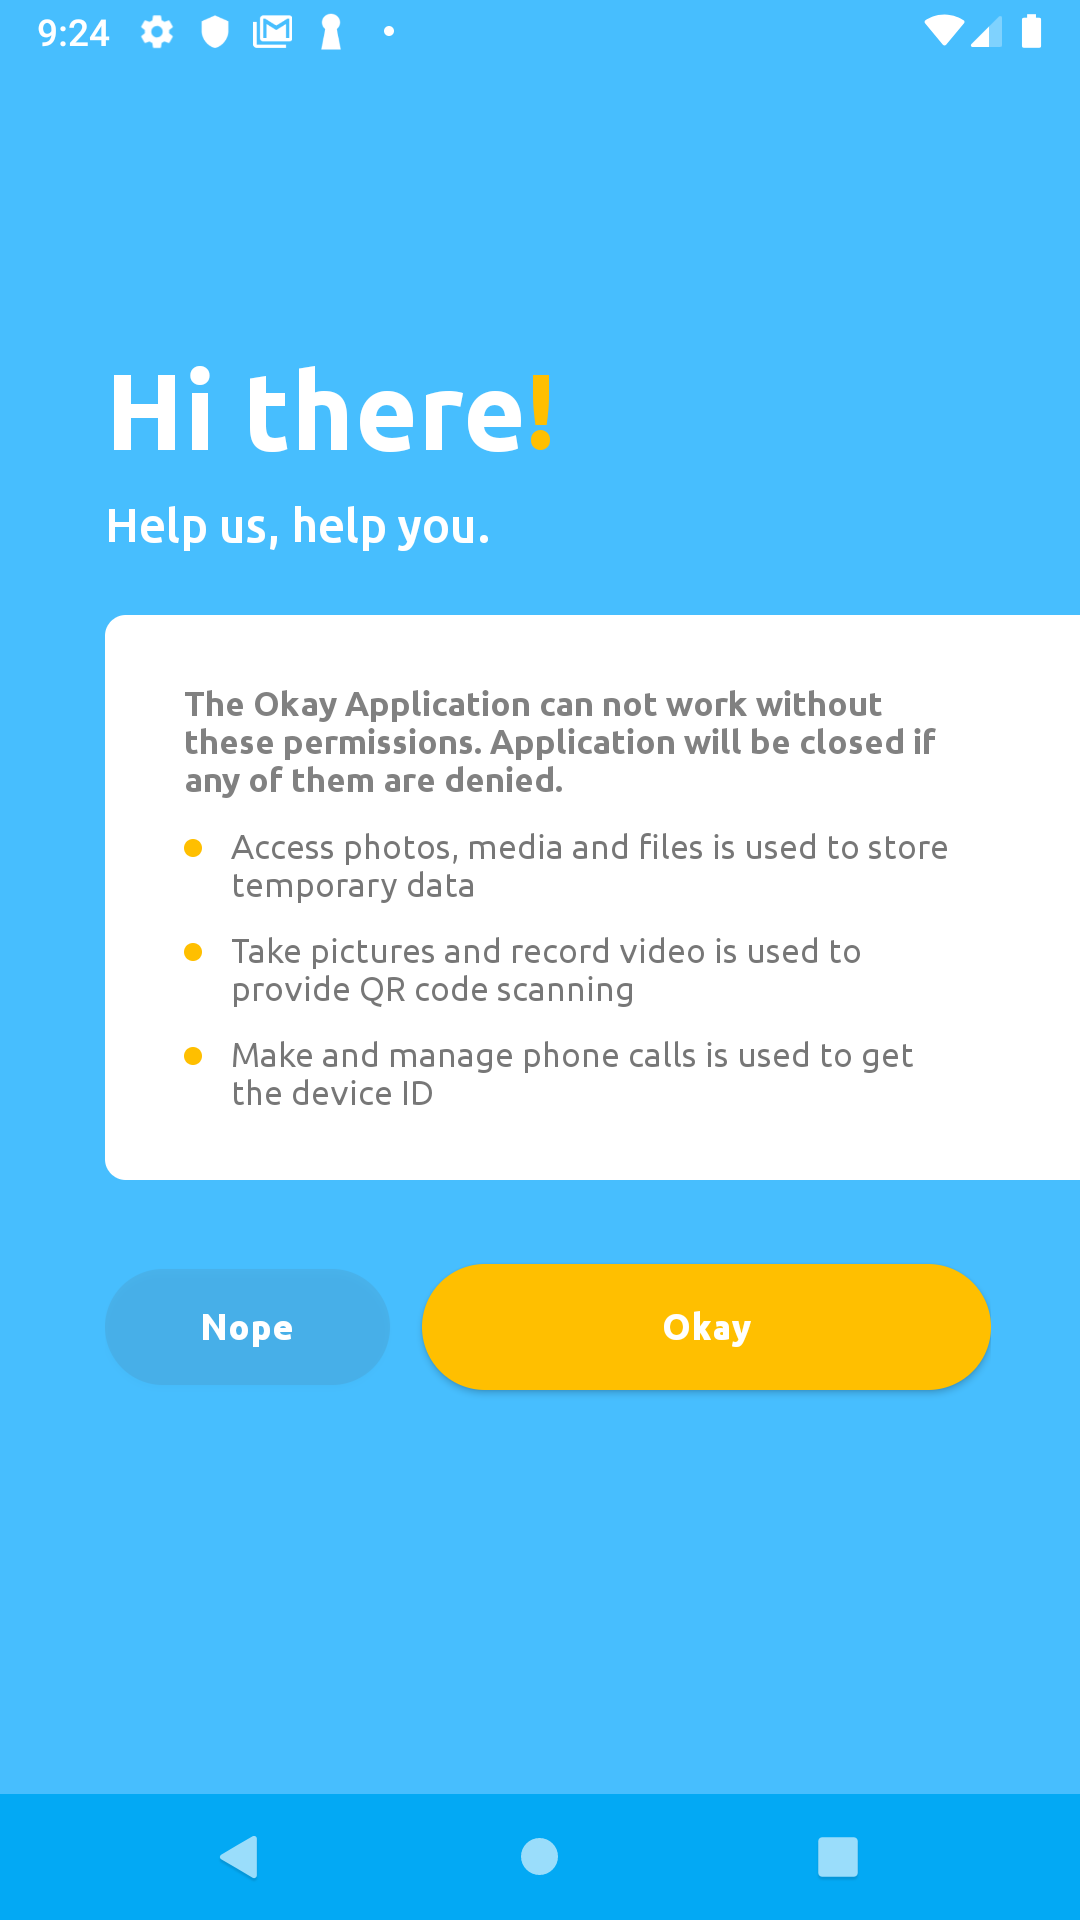
To test if your server is working properly, we strongly recommend you to download the Okay mobile app from Google Play Store (Android) or Apple App Store (iOS).
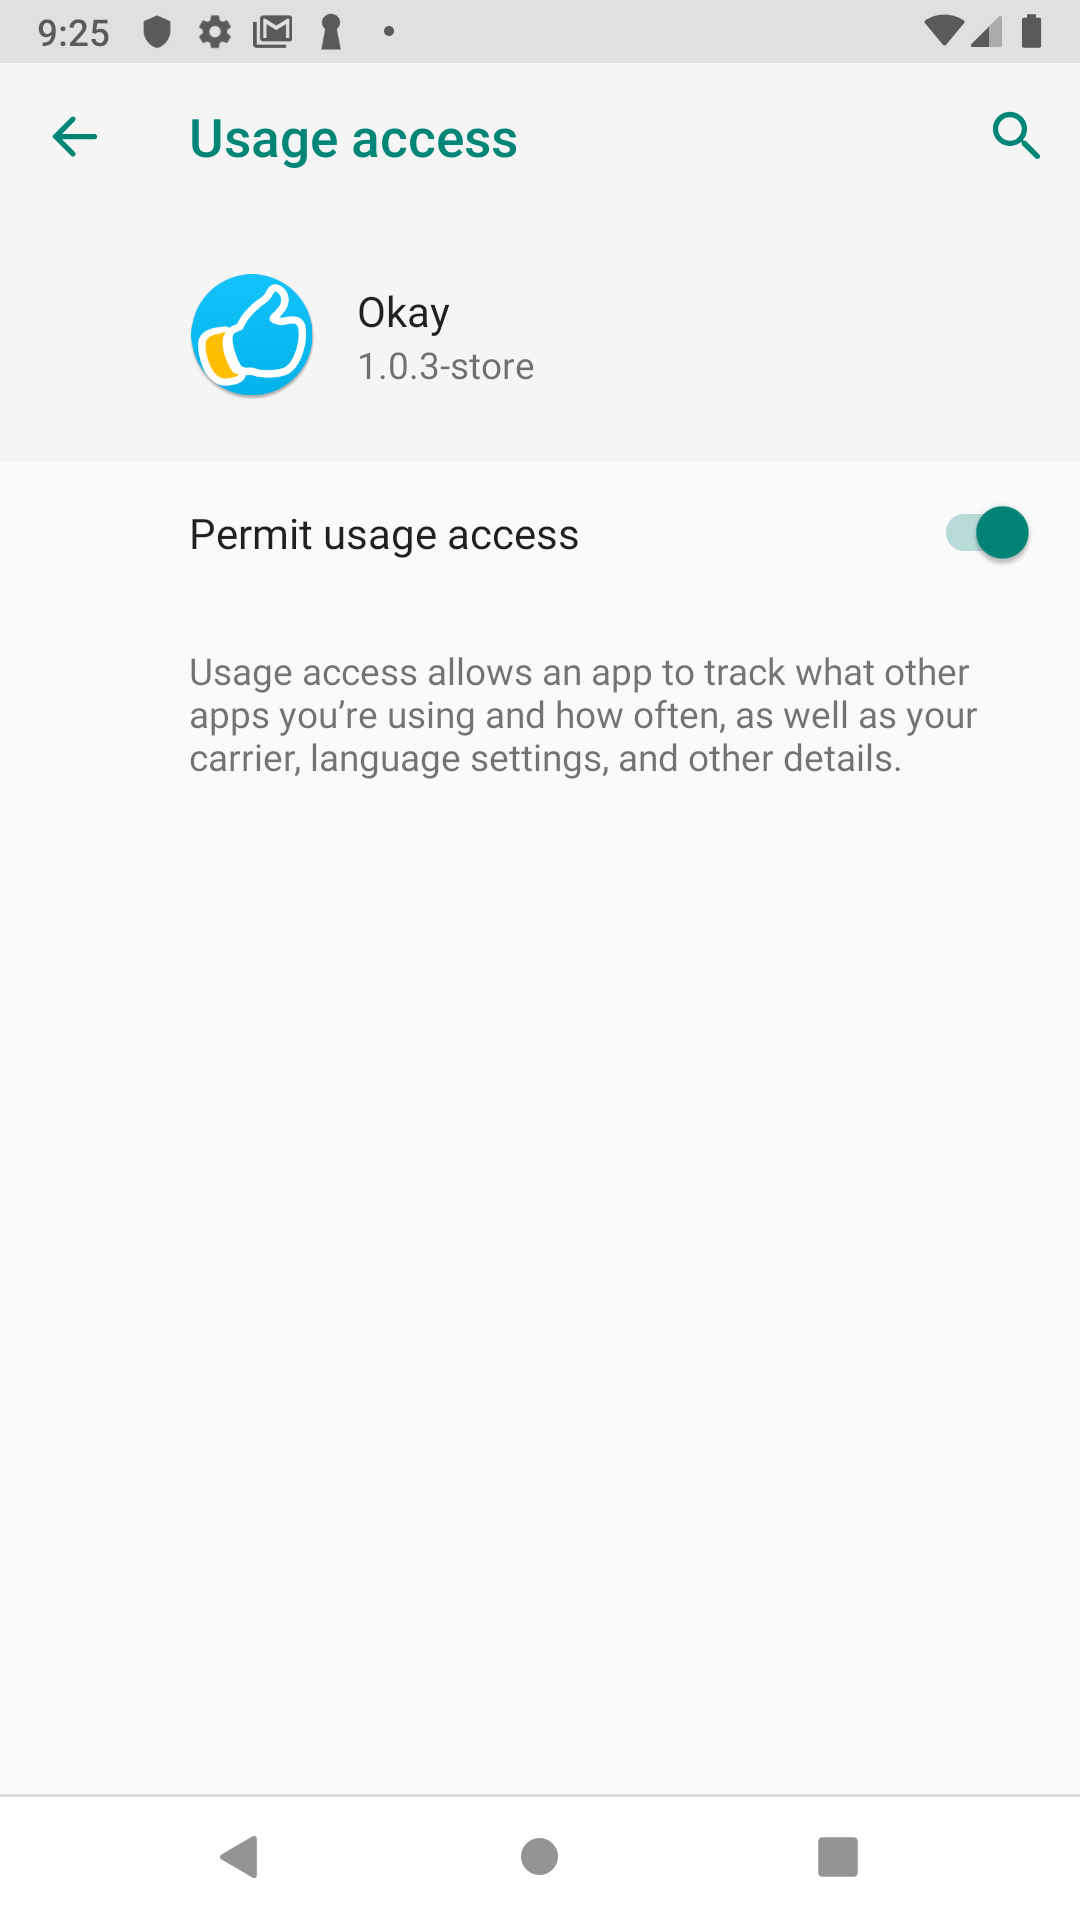
After installation, proceed to granting these permissions:

Click the check box on this screen to grant permission, then press the back button twice to return the app:
Grant all permissions:
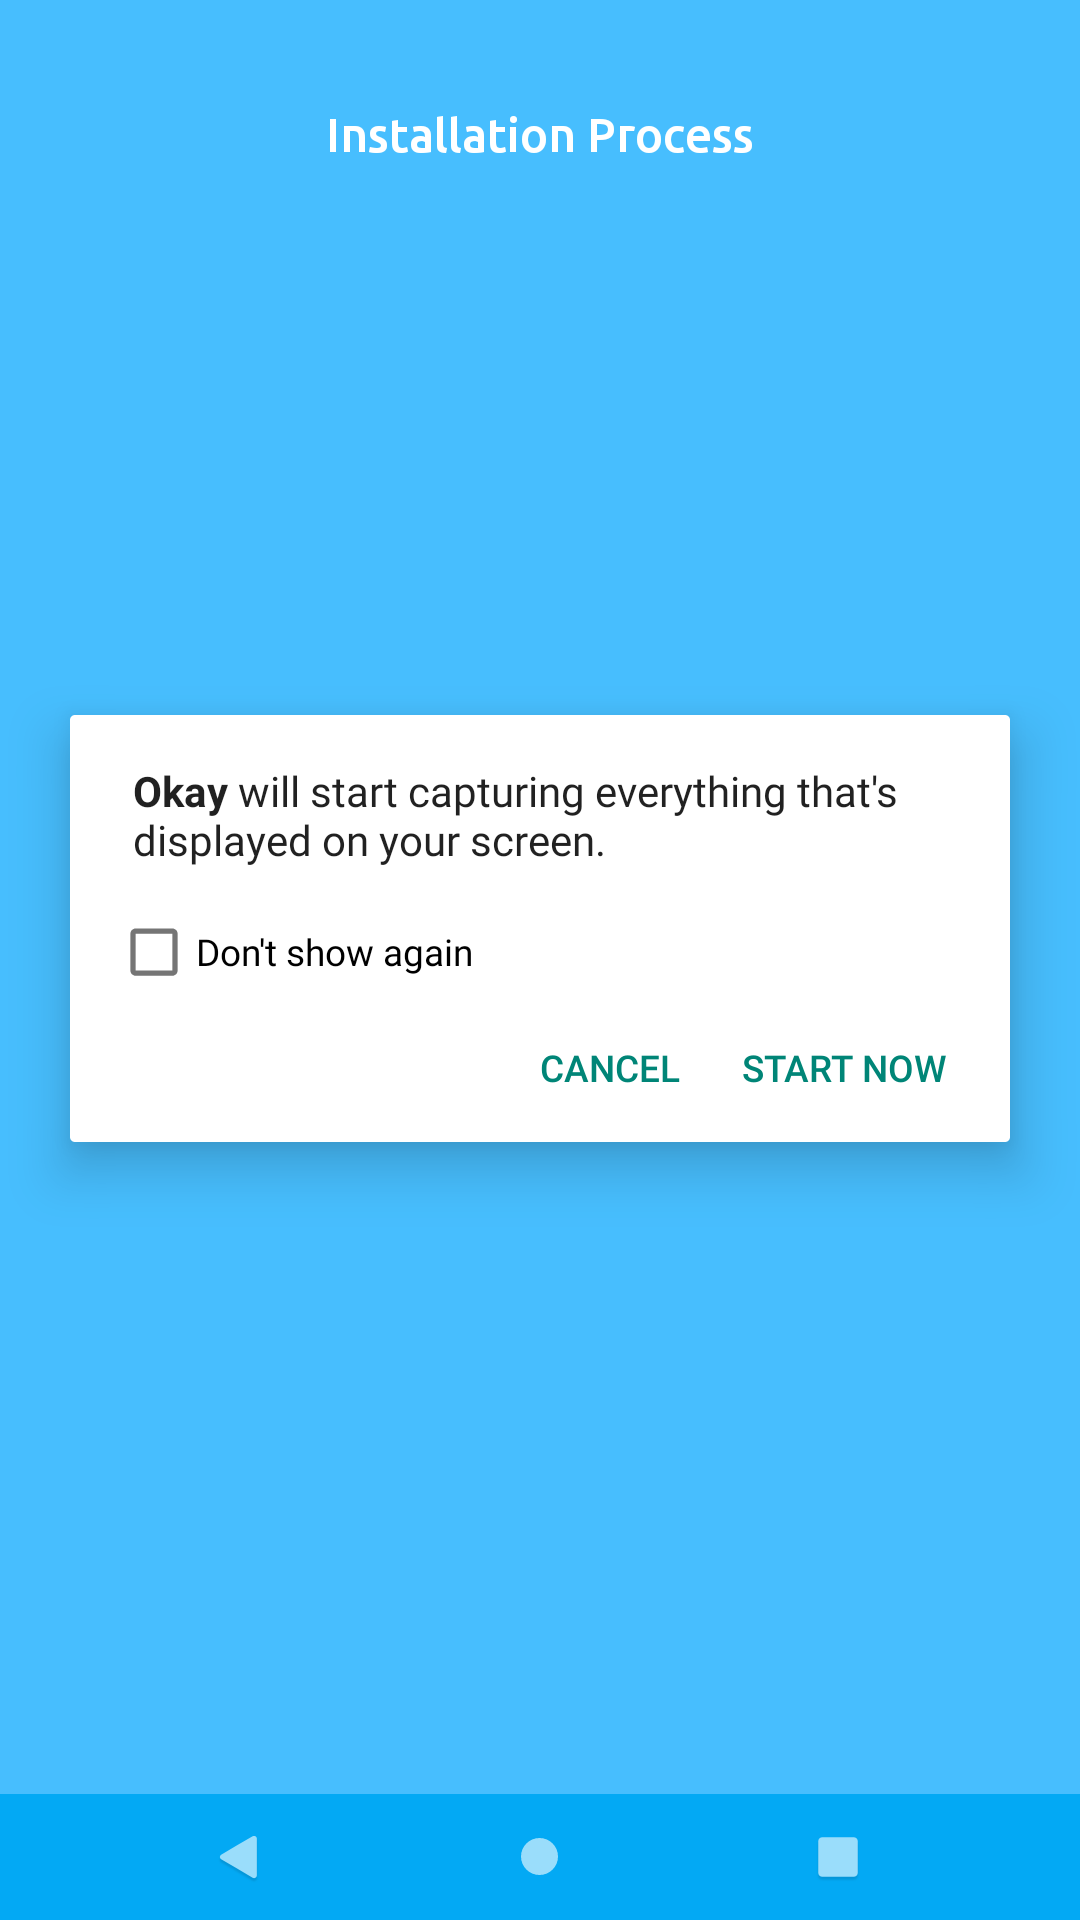
To proceed with linking, click the white button on this screen below:

You will be redirected to a camera screen. Click the button at the bottom of the camera screen to proceed to the linking screen shown below:
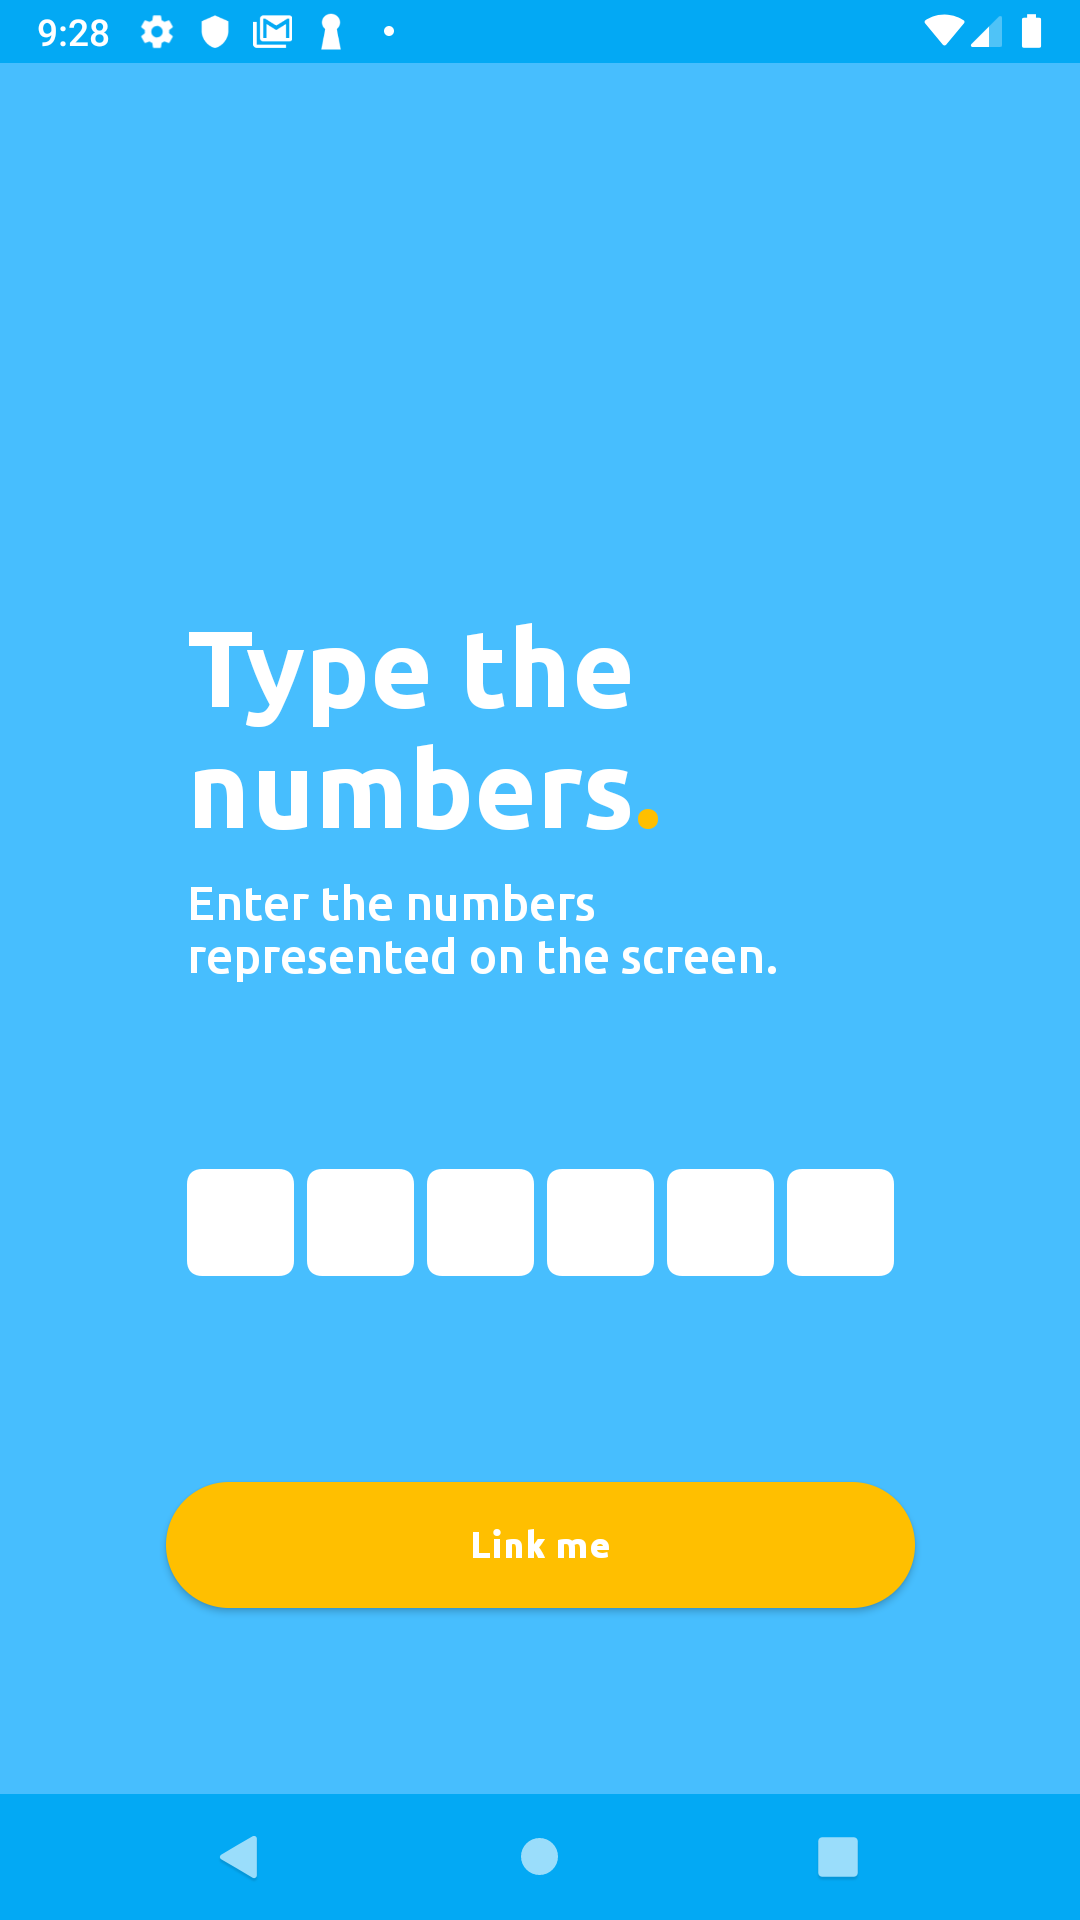
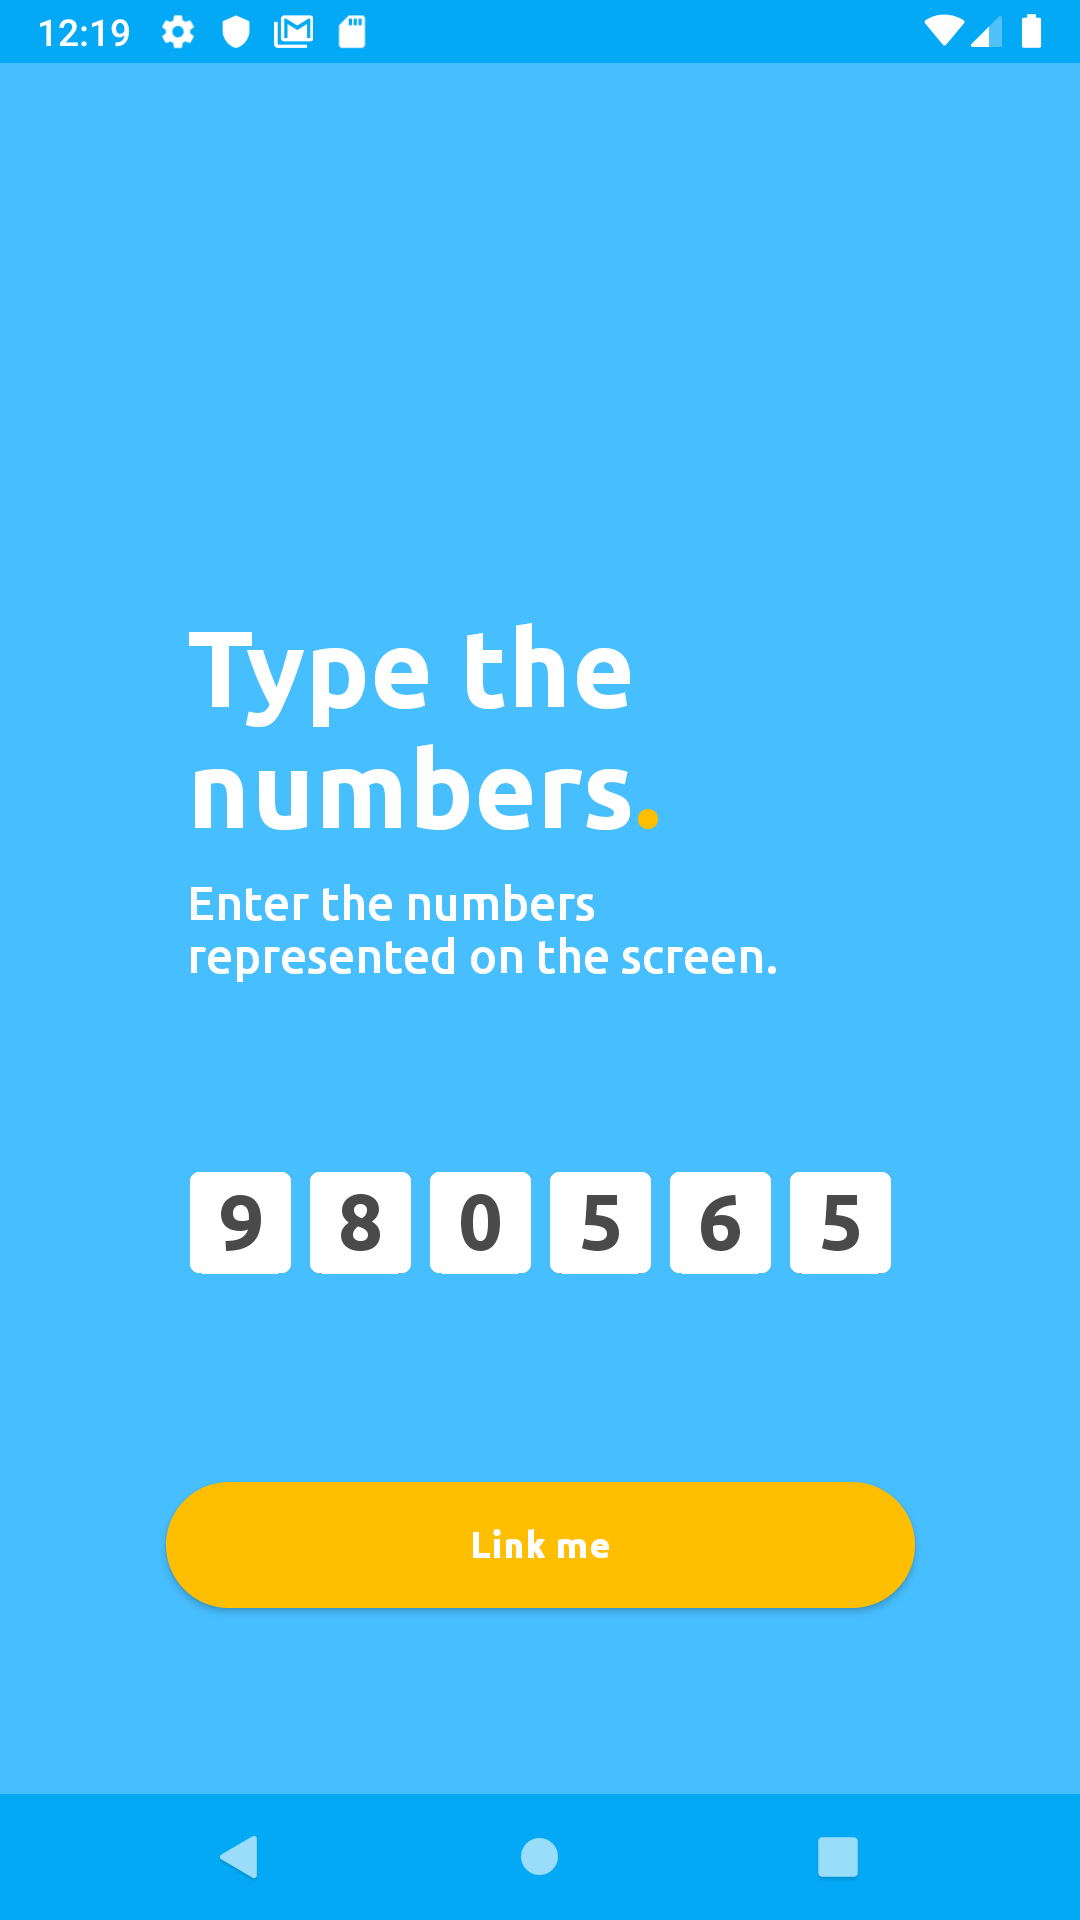
Enter the six digits linkingCode you received from your linking response into the mobile app's input field, then click Link me on the app. In our case, the linkingCode was 980565:
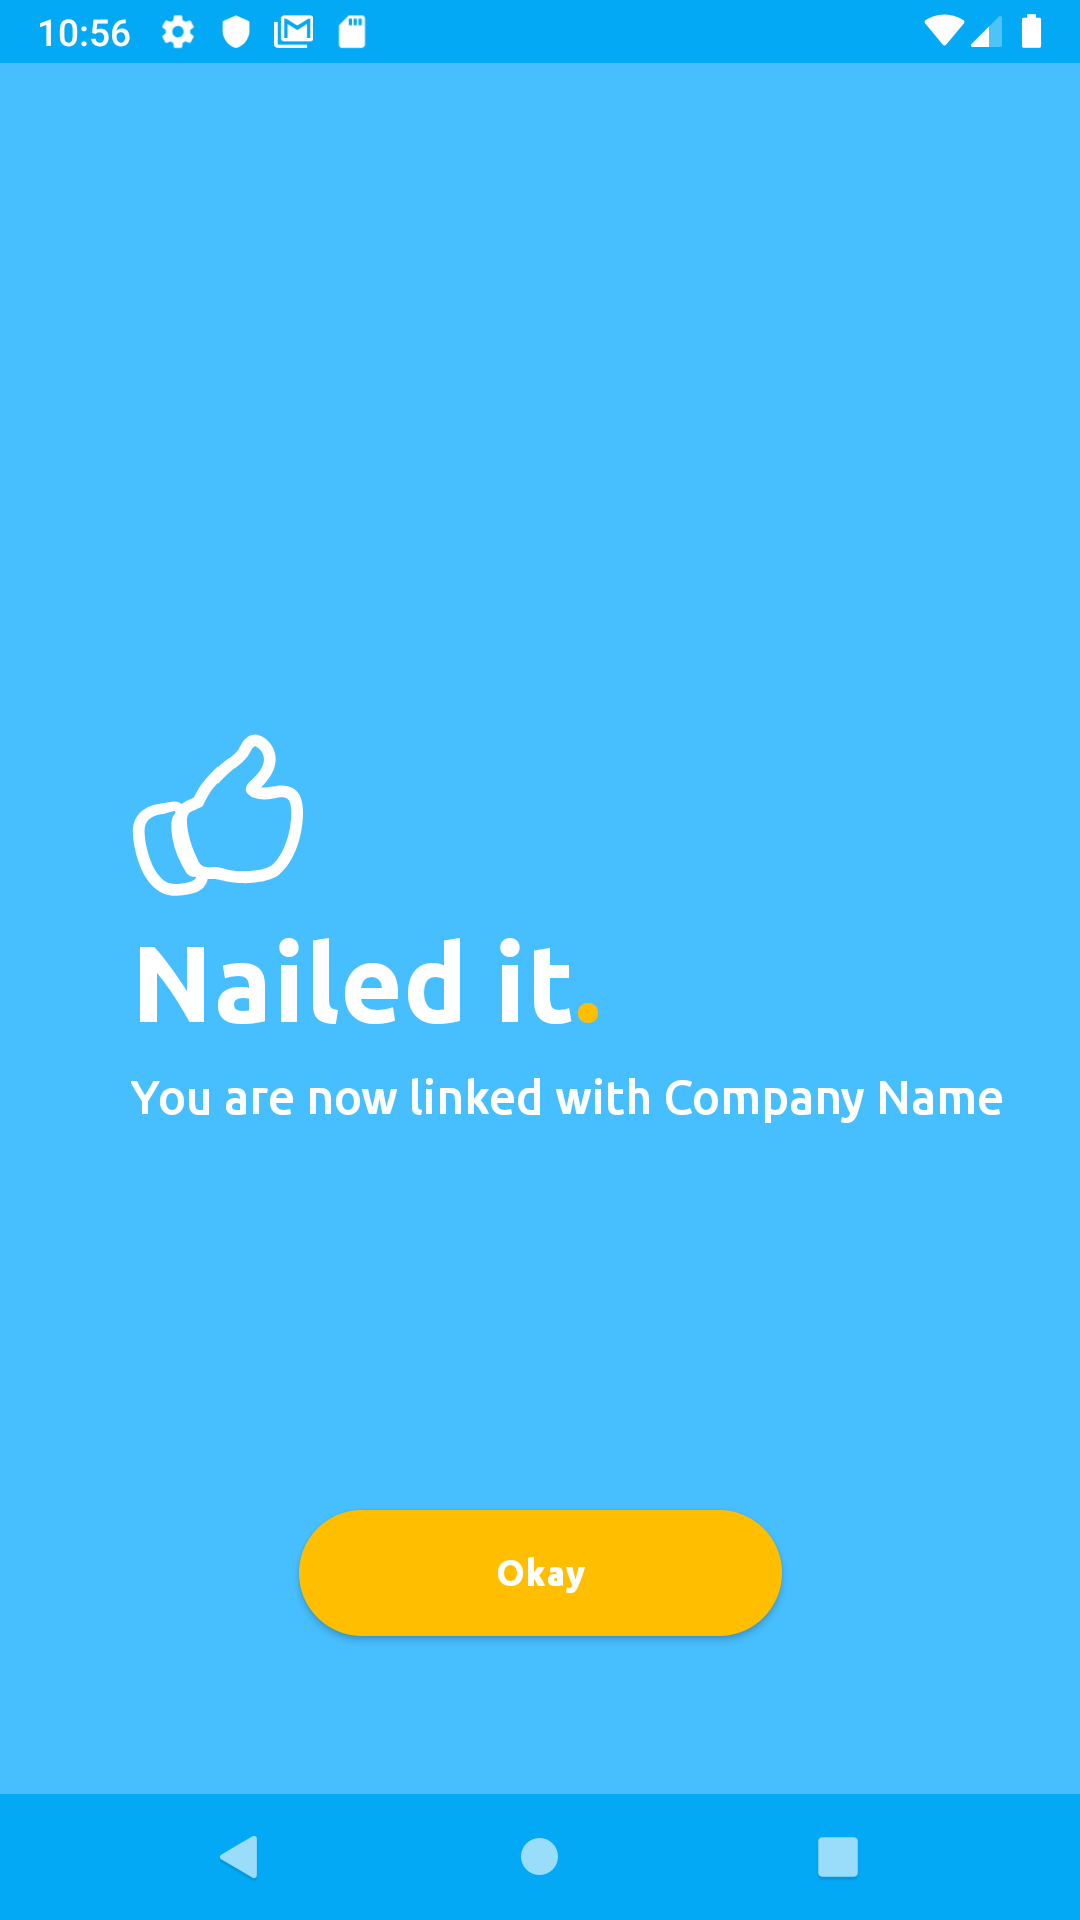
If there were no errors, you will be presented with a similar screen that looks like the one below:
After linking a user, we can now authenticate that user or authorise the user's action.
Just like linking a user, we will be sending a JSON payload as a POST request to Okay using the link below
https://demostand.okaythis.com/gateway/session {
"tenantId": "<your tenant id>",
"userExternalId": "User Unique Identifier",
"type": "<Authorization type>",
"authParams": {
"guiText": "message that is shown in the Okay application",
"guiHeader": "header of the message that is shown in the Okay application"
},
"signature": "BASE64[SHA256(tenantId | userExternalId | guiHeader | guiText | type | secret)]"
}For this request, we will be adding two new fields, the type and authParams fields.
The type key in our JSON payload is a field that allows us to clearly specify the kind of authorisation/authentication we choose to initiate. The type key can take as value any of these authentication types listed below.
AUTH TYPE           |  AUTH CODE
--------------------------------
AUTH_CANCEL         |   101
AUTH_PIN            |   102
AUTH_OK             |   103
DEVICE_INFOR        |   104
SET_PIN             |   105
USER_FORGOT_PIN     |   106
BIOMETRIC_OK        |   107
FALLBACK            |   108
All possible authentication codes/types are listed on the Session Types page.
The authParams just contains a message (guiText) and the message header (guiHeader) that will be displayed on Okay app. The message is intended for the user to read, to approve, or to decline a transaction/authentication request.
We can now send our request to Okay secure server using the sample code below.
const crypto = require('crypto')
  const axios = require('axios')

  const PSS_BASE_URL = 'https://demostand.okaythis.com';
  const tenantId = 40007; // replace with your tenantId
  const userExternalId  = 'uid406jkt'; // replace with your unique user id
  const secret = 'securetoken'; // replace with your secret
  const authParams = {
    guiText: 'Do you okay this transaction',
    guiHeader: 'Authorization requested'
  };
  const AUTH_TYPES = {
    OK: 101,
    PIN: 102,
    BIOMETRIC_OK: 105,
}
  const type = AUTH_TYPES.OK

  const hashStr = `${tenantId}${userExternalId}${authParams.guiHeader}${authParams.guiText}${type}${secret}`;
  const signature = createHashSignature(hashStr);


  axios({
    method: 'post',
    headers: {
      'Content-Type': 'application/json'
    },
    url: `${PSS_BASE_URL}/gateway/auth`,
    data: {
      tenantId,
      userExternalId,
      type,
      authParams,
      signature
    }
  })
  .then((response) => {
    console.log(response.data);
  })
  .catch((error) => {
    console.log(error.response.data)
  });

  function createHashSignature(hashStr) {
    return crypto
      .createHash('sha256')
      .update(hashStr)
      .digest('base64')
  }
If your request was processed without errors, you'll get a response with the following structure:
{
  "status": {
    "code": "<status code>",
    "message": "status message"
  },
  "sessionExternalId": "unique session identifier"
}
{
  "status": {
    "code": 0,
    "message": "OK"
    },
  "sessionExternalId": 100227
}
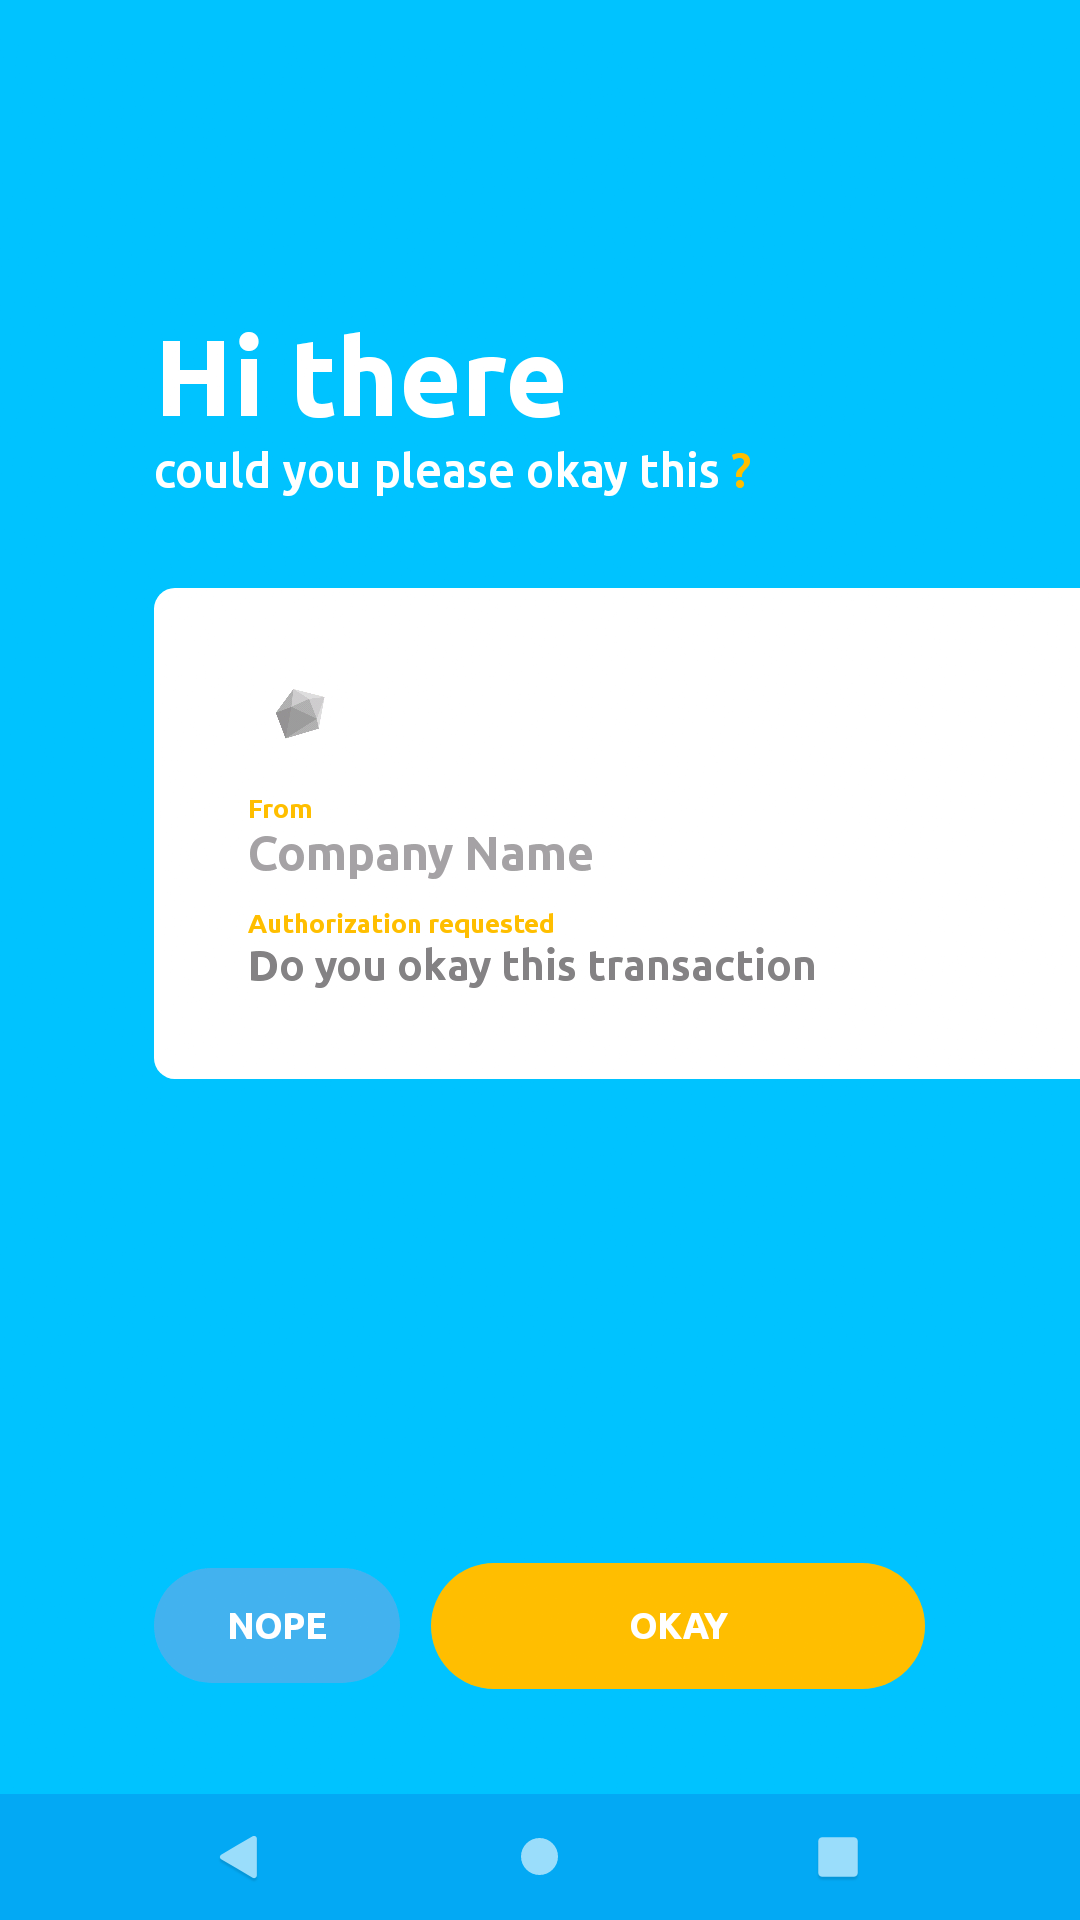
If a secure communication channel was succcessfully established, Okay presents the authorization screen.
Click the "OKAY" button to grant authorization.
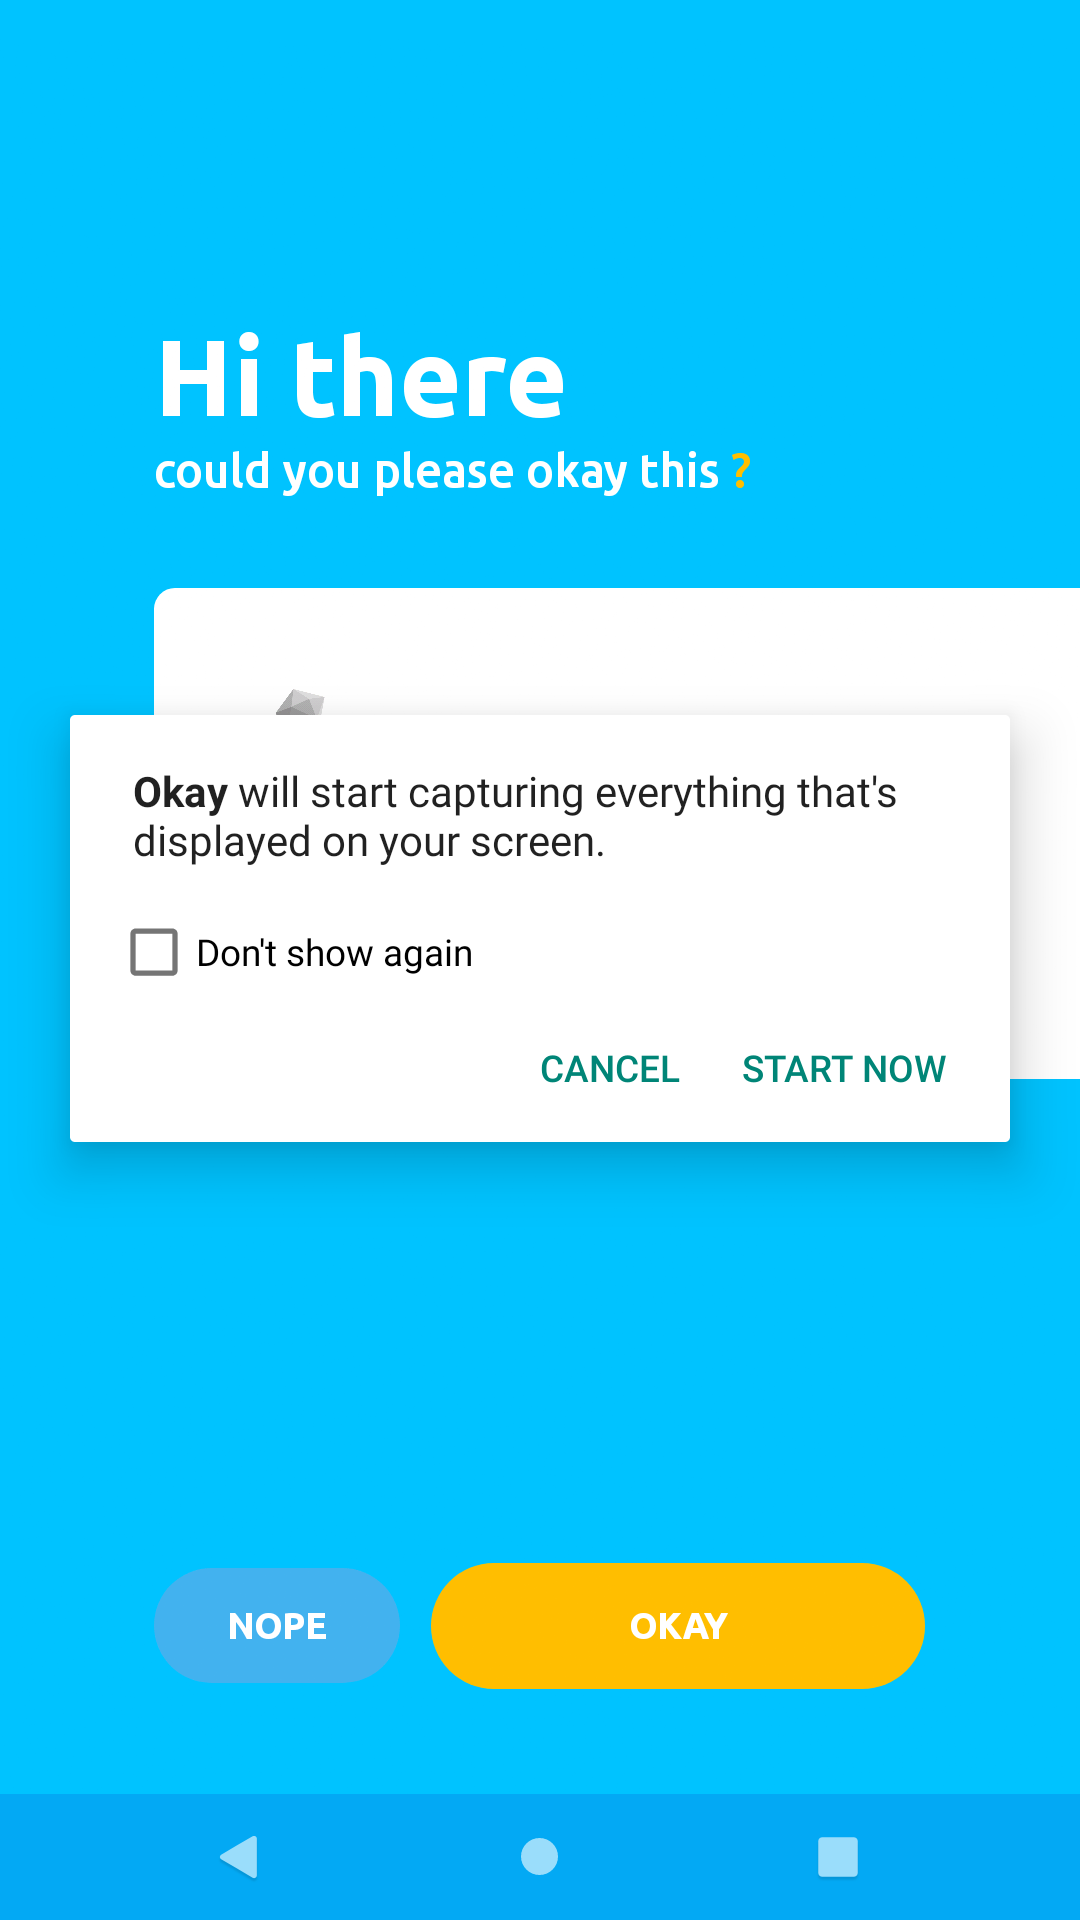
Click "Start Now" on the modal popup shown below to proceed:
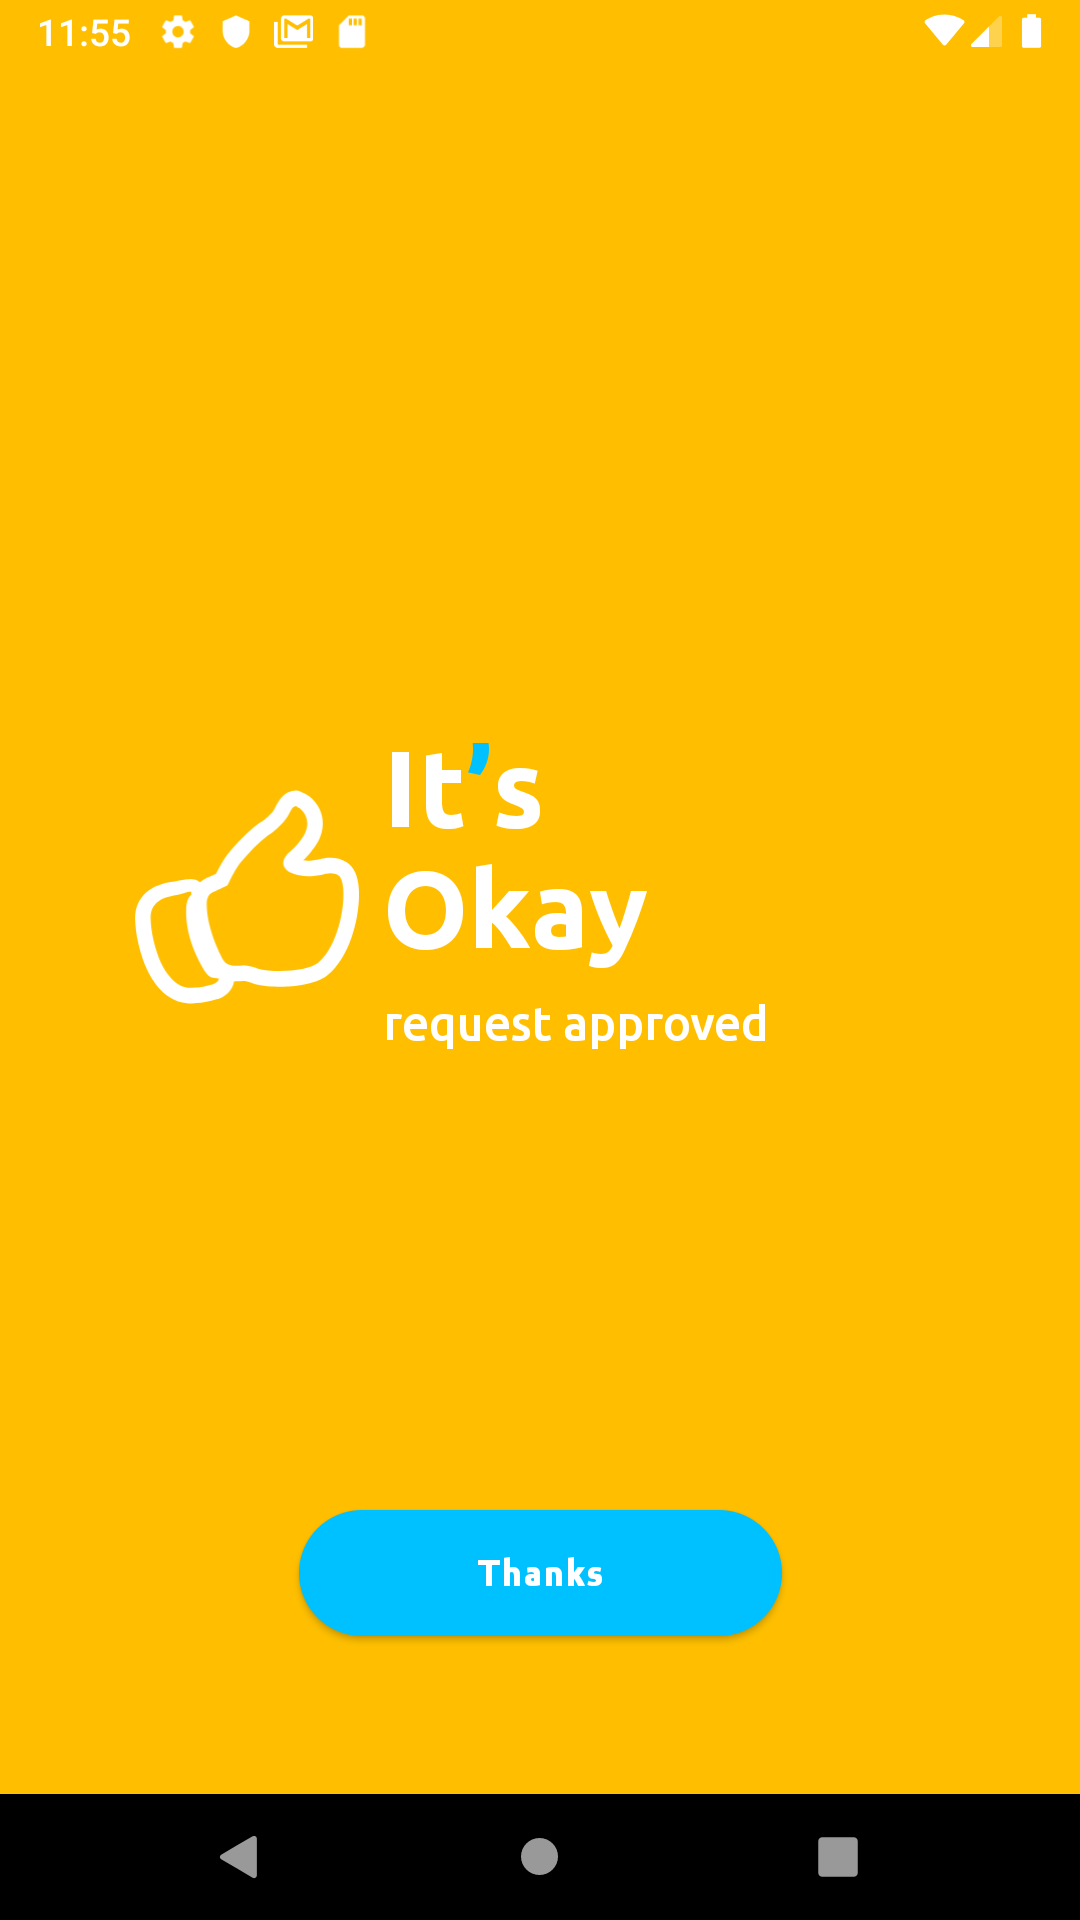
If there were no errors processing your confirmation action, Okay will present a success screen like the one below to notify you that your response to the transaction authorisation request was processed successfully.
For better reference to all possible status code and messages you can receive from the Okay server, please refer to this link.
The sessionExternalId can be used to check the status of this request. We will see shortly, in the Check Authentication/Authorisation Status section, how we can use the sessionExternalId value retrieved from the response to check the status of our transaction.
After authorising a transaction or authenticating a user, we can check the status of that request by sending a JSON payload as a POST request to this endpoint:
Note: You may not need to call this endpoint as Okay secure server will send a callback request with the status of your transactions.
https://demostand.okaythis.com/gateway/check
  {
    "tenantId": "<your tenant id>",
    "sessionExternalId": "Unique session Identifier",
    "signature": "BASE64[SHA256(tenantId | userExternalId  | secret)]"
  }
const crypto = require('crypto')
const axios = require('axios')
const PSS_BASE_URL = 'https://demostand.okaythis.com';
const tenantId = 150001; // replace with your tenantId
const sessionExternalId = 100227; // "replace with your 'sessionExternalId' from previous Auth request
const secret = 'securetoken'; // //replace with your secret
const hashStr = `${tenantId}${sessionExternalId}${secret}`;
const signature = createHashSignature(hashStr);
axios({
method: 'post',
headers: {
'Content-Type': 'application/json'
},
url: `${PSS_BASE_URL}/gateway/check`,
data: {
tenantId,
sessionExternalId,
signature
}
})
.then((response) => {
console.log(response.data);
})
.catch((error) => {
console.log(error.response.data)
});
function createHashSignature(hashStr) {
return crypto
.createHash('sha256')
.update(hashStr)
.digest('base64')
}If your request was processed without errors, you'll get a response with the following body structure:
{
  "status": {
    "code": "<status code>",
    "message": "status message"
  },
  "authResult": {
    "dataType": "<result data type code> eg. 101, 102, 103",
    "data": "user response eg. CANCEL, PIN, OK"
  }
}
The authResult field may contain any of these values from the table below, as a user response from the mobile app:
AUTH RESULT TYPE     |  AUTH RESULT CODE
--------------------------------
CANCEL               |   101
PIN                  |   102
OK                   |   103
Check out the AuthData Types page to see all available values for the dataType.
A detailed explanation can be found here.
The Okay secure server allows tenants to check if devices running their application built with Okay SDK has a biometric sensor enabled.
To get this information, you are required to send a POST request to Okay secure server at this endpoint:
https://demostand.okaythis.com/gateway/session
The body of the request should be as shown below:
{
    "userExternalId": "<user_external_id>",
    "tenantId": "<tenant_id>",
    "type": "DEVICE_INFO",
    "sessionParams": {
        "deviceData": "isBioEnabled"
    },
    "signature": "<signature_hash>"
}
When an end-user clicks the Okay(Approve) or Cancel button in Okay Application, the result is sent to an Okay service that links the user device with your identifier for that user. Whenever a user is linked successfully on Okay’s secure server, a callback is sent to your service as a notification.
Some actions might take the user a while to accomplish. To prevent long-lasting requests and overloading the Okay server with an enormous amount of Check Requests, the Okay server sends callbacks when a long-lasting action is completed. The target URI should be configured with the Okay website on the Tenant Settings page.
Note: Every callback has a signature value. It is important to verify this signature value to ensure that the callback data has not been tampered with.
When an end-user completes linking, the Okay server sends the following JSON data to the callback URL that was specified on the tenant settings page:
{
    "status": {
        "code": <status code>,
        "message": "status message"
    },
    "type": 101,
    "userExternalId": "unique user identifier",
    "signature": "callback signature"
}
Okay sends this JSON body when a transaction response from the Okay mobile application is received.
The authResult key in the response above has the same structure as the authResult returned from Check Authentication/Authorization Status request.
{
    "status": {
        "code": <status code>,
        "message": "status message"
    },
    "type": 102,
    "userExternalId": "unique user identifier",
    "signature": "callback signature"
}
When an end-user removes your service from the list of connected services from Okay (i.e. unlinks your tenant), Okay sends to your server via the callback URL a JSON response having the structure below:
{
    "status": {
        "code": <status code>,
        "message": "status message"
    },
    "type": 103,
    "userExternalId": "unique user identifier",
    "signature": "callback signature"
}
If your request to check if a valid biometric sensor is available on the device running your app was processed successfully, you should receive an invocation of your callback endpoint with a similar JSON object like the one below as the request body.
{
    "sessionResult": {
        "dataType": "104",
        "data": "isBiometryEnabled=1;isApnsEnabled=1;"
    },
    "userExternalId": "3137",
    "sessionExternalId": "180001",
    "type": "104",
    "status": {
        "code": "0",
        "message": "OK"
    },
    "signature":"tMeg677BzEwheevEmv42aHgBtVQX8tBOj+6g+uuBVe0="
}